Setting Up Hadoop on a Raspberry Pi Cluster

At $35 dollars each, the Raspberry Pi has made it possible to study distributed computing on the cheap. So for approximately $200 I was able to pick up 4 Raspberry Pi units, 4 microSD cards, an ethernet switch, and enough power & ethernet cables to set up a tiny 4-node cluster.

I had been curious about Apache’s Hadoop framework so decided that it would be the first application I’d install on the cluster. In this post, I’ll describe the process of installing and running Hadoop on a single node then do the same for a multi-node cluster in a future post.

Setting up the Raspberry Pi

The first step is to download and install an operating system. Raspbian, the official OS for the Pi, is available in two flavors, Raspbian with Pixel and Raspbian Lite. Raspbian with Pixel is similar to the operating systems we’re all familiar with; a desktop interface with point and click controls. Raspbian Lite, however, lacks a desktop environment completely and boots directly into the command line interface. As a result, Raspbian Lite occupies less disk space and consumes less resources than Raspbian with Pixel. Since my pi’s will be headless, I decided to install Raspbian Lite.

Installing the OS onto a microSD card requires an image writing tool. On Linux and MacOS, the dd terminal command works perfectly fine. Windows users will have to download a separate program (such as Win32DiskImager) to accomplish this task. More information on installing the OS can be found here.
With the OS installed, the next step is to configure the pi. First, login with the default credentials:

username: pi
password: raspberry

Then access the Software Configuration tool by executing the following command:
sudo raspi-config
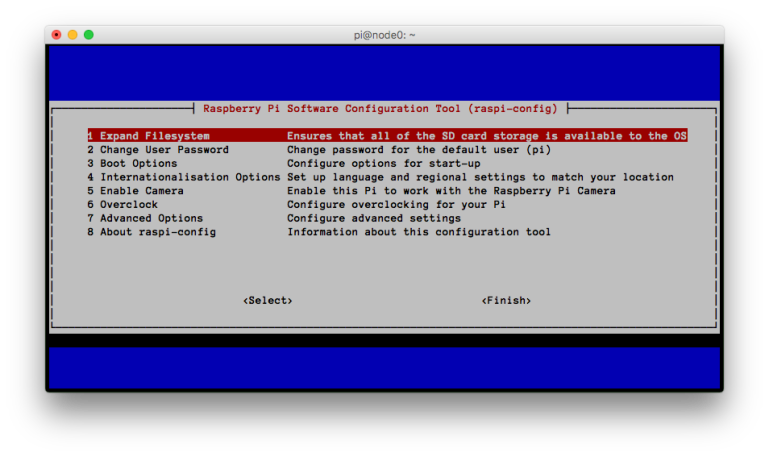
raspi-config

The raspi-config tool provides access to the most commonly changed configuration options.

And make the following changes:

  • Expand the Filesystem: Newer releases of Raspbian will automatically perform this operation but it can be invoked manually.
  • Change User Password: Change the current password to something more secure.
  • Advanced Options → Hostname: Since I’m setting up the first node in the cluster, I’ve set this value to node1.
  • Advanced Options → Memory Split: Since my pi will be headless, I’ve changed the GPU memory to 8 MB.
  • Advanced Options → SSH: Enable

Exit the Configuration Tool by selecting Finish. The machine may reboot. Once we’re back at the CLI we’ll configure the network.

Create a static IP

To make it easier for our nodes to communicate with each other, we’ll assign each one it’s own IP address. To do so, type sudo vi /etc/dhcpcd.conf and paste the following into the bottom of that file:

interface eth0
static ip_address=192.168.1.101
static routers=192.168.1.1
static domain_name_servers=192.168.1.1

This will assign our first node an IP address of 192.168.1.101. We’ll follow this convention so that our second node will be 192.168.1.102, the third 192.168.1.103, etc.

Install Java

According to the Hadoop documentation, “Version 2.7 and later of Apache Hadoop requires Java 7.” Installing Java from the command line is simple but first we should update our repository package lists and upgrade any out-of-date packages with the following commands:
sudo apt-get update
sudo apt-get upgrade

Then install Java 7:
sudo apt-get install oracle-java7-jdk

To verify that Java was installed correctly, executing the command java -version should produce the following output:

java version “1.7.0_60”
Java(TM) SE Runtime Environment (build 1.7.0_60-b19)
Java HotSpot(TM) Client VM (build 24.60-b09, mixed mode)

Create a Dedicated Hadoop Environment

Creating a dedicated Hadoop user and group separates the Hadoop installation from other services on the machine.

We’ll first create a “hadoop” group with the following command:
sudo addgroup hadoop

Then add a user to that group:
sudo adduser --ingroup hadoop hduser

Finally, grant this user root privileges:
sudo adduser hduser sudo

Create and Setup SSH Certificates

From this point on, we’ll be working in our newly created Hadoop environment so switch to the hduser account:
su hduser

And generate a SSH authentication key:
ssh-keygen -t rsa -P "" # It is okay to accept the default filename

Add the newly created key to the list of authorized keys so Hadoop can SSH to the localhost without prompting for a password:
cat /home/hduser/.ssh/id_rsa.pub >> /home/hduser/.ssh/authorized_keys
OR
ssh-copy-id localhost

Verify that the key was added by attempting to SSH to the localhost:
ssh localhost

Once connected to the localhost, you can disconnect by typing exit.

Install Hadoop

Navigate to the Apache Hadoop Releases page and download the binary Tarball. You can then transfer the file to the pi with scp or download it directly from the pi with the wget command. After the file has downloaded, verify its integrity by calculating and comparing its checksum to that provided by Apache. If the two values match, then extract the files by executing:
tar xvf name-of-hadoop-tarball.tar.gz

We’ll use the mv command to move the Hadoop files from the current working directory (likely the home directory) to the /usr/local directory:
sudo mv hadoop-2.7.3 /usr/local/ # The name of your folder may be different depending on the version of Hadoop you downloaded.

The next two steps are optional but help in maintaining and updating Hadoop.

  1. In /usr/local/ create a softlink to the hadoop-2.7.3 folder:
    sudo ln -s /usr/local/hadoop-2.7.3 /usr/local/hadoop
  2. Copy the Hadoop configuration folder to /usr/local:
    sudo cp -r /usr/local/hadoop-2.7.3/etc/hadoop/ /usr/local/hadoop-config

Now, should we decide to use a different version of Hadoop, all that needs to be done is to update the softlink to point to the new version. Since the configuration files are not stored with the old version, we remove those files without having to reconfigure the system.

Update Environment Variables

Hadoop has a set of environment variables that need to be added to the system but before we get to that, we’ll have to determine the location of your Java installation. This is easily obtained by executing this command:
readlink -f /usr/bin/javac | sed "s:/bin/javac::"

On my system, it produces the following:
/usr/lib/jvm/jdk-7-oracle-arm-vfp-hflt

Copy this location as we’ll need in the next step.

Now, open up your .bashrc file and add the following:

# Java environment variable
export JAVA_HOME=”/usr/lib/jvm/jdk-7-oracle-arm-vfp-hflt”

# HADOOP environment variables
export HADOOP_PREFIX=”/usr/local/hadoop” # Path to Hadoop
export HADOOP_HOME=$HADOOP_PREFIX
export HADOOP_COMMON_HOME=$HADOOP_PREFIX
export HADOOP_CONF_DIR=$HADOOP_PREFIX/hadoop-config # Our config folder
export HADOOP_HDFS_HOME=$HADOOP_PREFIX
export HADOOP_MAPRED_HOME=$HADOOP_PREFIX
export HADOOP_YARN_HOME=$HADOOP_PREFIX

# Update PATH environment variable:
export PATH=”$HADOOP_PREFIX/bin:$HADOOP_PREFIX/sbin:$PATH”

Reload the .bashrc file so the new environment variables are visible to the current shell:
source ~/.bashrc

Verify Hadoop Installation

At this point, we’re pretty much done! We can check that Hadoop has been installed correctly simply by checking the version:

hadoop-version

Verifying that the installation was successful.

WordCount in Non-Distributed Mode

By default, Hadoop is configured to run in non-distributed mode, as a single Java process. Therefore, we can actually run a MapReduce job from our single node. Executing the following command will run the WordCount program on the LICENSE.txt file and write its results to the output directory:

hadoop jar /usr/local/hadoop/share/hadoop/mapreduce/hadoop-mapreduce-examples-2.7.3.jar wordcount /usr/local/hadoop/LICENSE.txt ~/output

The results of the WordCount application can be viewed by executing:
cat ~/output/part-r-00000

That’s it. We now have a single node running Hadoop in non-distributed mode.
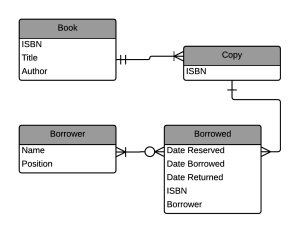
Data Design: Modeling and ERDs

This week we were lucky to have a relatively simple set of WODs which focused on data design and generating Entity Relationship Diagrams. Although simple, this topic is extremely important and necessary for next weeks lesson, Data Design Implementation. Since I’ve studied this material in the past, this was a great (and very much needed) review.

WOD 1: Library Data Model
In our first WOD, we were tasked with designing a data model for the typical library system. In this system, the library holds multiple copies of books. Patrons, who are either students or faculty members, can borrow and reserve up to 5 books. This system must be designed to meet the following requirements:

  • Check whether a recently returned book has been reserved
  • Check which borrower has a specific book on loan
  • Check which books are currently with a specific borrower
  • Check the status of a particular book (borrowed/not borrowed)
  • Check which reservation should receive a recently returned book
  • Retrieve the loan and reservation history for a book

Since I’ve studied data design in previous classes and I’ve worked with Lucid Charts before, I found this WOD fairly easy to accomplish. I finished my first and only attempt in Av time of 15 minutes and 38 seconds. Here is the Entity-Relationship Diagram I drafted for this problem which, I believe, meets the required specifications:

ERD-Library

WOD 2: Car Rental Data Model
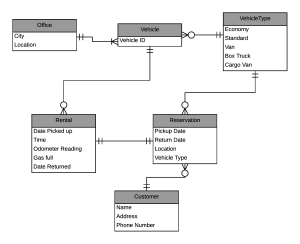
The Second WOD was similar to the first but a bit more challenging. We were instructed to create an ERD for a car rental company. The company has a number of offices in various cities and locations. Each location has a set of vehicles, each vehicle can be categorized into one of five vehicle types (i.e. Economy, Standard, Van, Box Truck, Cargo Van). Customers can reserve a vehicle at a specific location for a set date and time. When the vehicle is returned, the car rental clerk records the date, time, odometer reading and gas level.

Like the previous WOD, I was able to finish my first and only attempt in AV time of 14 minutes and 35 seconds. While my solution varies slightly from that presented by the professor, I believe that it provides a satisfactory design for this data model. Here is my ERD:

ERD-CarRental

Conclusion
The exercises this week were fairly simple to accomplish but we can easily see how models can quickly get complicated as the data and relationships become more complex. In the application that I am building for the final project, I already know that I am going to have at least 4 different entities: Users; News subscriptions; Commute subscriptions; and Blog subscriptions, however, this number may change. Representing my data model as an ERD will undoubtedly be helpful and provide direction when I eventually take on the task of implementing the backend database.

Notify Hawai’i – Milestone 1

NotifyHawaii
Development of the Notify Hawai’i web application is progressing at a steady rate. Here I will describe the current state of the system, what I am working on for the next milestone release, and discuss my experience with project management.

Current State
There is an in-memory database to store user information (i.e. first name, last name, email address, telephone number, and cell phone provider). This information will be gathered and validated when users register for an account with the application, however, this function is not yet implemented. User information is edited from the ‘My Account’ page.

There is a second in memory repository to store News Service subscriptions for each user. These subscriptions are added and updated from the News Services webpage. Currently, user and subscription information is added to the database during the initialization of the application on start up.

The application is able to retrieve news articles from a specific set of online newspaper sites. These sites include the Honolulu Star Advertiser, the Maui News, and Civil Beat. The articles that can be retrieved are grouped into the following categories:

Honolulu Star Advertiser: Breaking News, Popular News, and Sports.

Maui News: Breaking News, Business News, Hawaii News, and Local News.

Civil Beat: Most Popular Stories, Honolulu News, Honolulu News, Education, Politics, Energy and Environment, and Development.

Articles are retrieved using the Jaunt Web Scraping API. Once articles have been harvested from the applicable websites, they are sent to users via email or text message. We use the Apache Commons Email API which includes the JavaMail API as well.

The future of Notify Hawai’i
There is still much work to be done on this application. While implementing the News Services module, I realized that sending a list of articles via SMS text message may not be a worthy endeavor. Depending on the number of subscriptions held by the user and the number of articles published by the site, these lists can be quite lengthy. Since HTML cannot be displayed in SMS text messages, there is no efficient way to present article titles and links. Therefore, I will most likely remove the text message option and only issue News notifications by e-mail.

For the next milestone release, I plan on implementing the Commute Services module. This service will allow users to request notifications when commute related events occur. By using the Google Maps API and Honolulu’s ‘TheBus’ Web Services API, I hope to be able to inform users on estimated commute times and bus services. I also plan on putting the finishing touches on the News Services and Account pages and bring them to a completed, fully functional state.

Project Management
I’ve had both good and bad experiences working alone on this project. It is nice to have complete control over the implementation but I often think another developers opinion would be a valuable and welcomed resource. Also, building the entire project by myself has required a huge amount of effort. It would have been nice to partner with someone to share that load. However, since the majority of the documentation has been written (i.e. the user and developer guides), maintaining them by incrementally adding updated information pertinent to the newly implemented functionality should be easy.

Going forward, I would like to be better about creating and closing Github issues. The issue management system is a great tool to guide software development and I should be utilizing it more. I am also going to start working off of branches from the master repo instead of doing all of the work in the master repo itself.

Overall, I feel that this project is progressing along at a reasonable rate and is actually useful in its current state. I’m excited and looking forward to building out the next few modules!

View the project on Github here.
View the deployed application on Heroku here.

Application Design: Tests and Templates

This week we endured one of the longest sequence of WODs to date. The majority of the exercises focused on the important task of implementing tests to challenge the application and ensure quality. We also studied the use and creation of template code to increase efficiency. Although these exercises were not particularly difficult, there were several little “gotchas” that resulted in my failing of a few of the exercises.

E47: Digits Test
The goal of the first WOD was to implement two simple tests to ensure basic functions of the application worked correctly. The first test checked that the index page could be successfully retrieved. The second test checked that a new contact could be added to the database and correctly displayed in the table of contacts.

Although I watched the introductory screencasts and studied the example applications, I struggled during my initial attempt at this WOD. Within 30 minutes, I had written the two test cases and created the applicable Page classes (following the page object pattern) but was unable to compile the code. In my application, the two test methods were passed the TestBrowser object which was then used to navigate through the application. This approach, however, is not valid in the Play framework as test methods cannot be passed parameters. After approximately 20 minutes, I managed to debug my way out of this predicament and successfully run the tests. In all, I spent over 50 minutes attempting to complete this WOD resulting in a DNF. After watching Dr. Johnson’s solution, I immediately repeated the exercise and completed my second attempt in Rx time of 17 minutes and 30 seconds.

E48: Digits Text Template
The second WOD was much easier than the first. The goal of this exercise was to use Scala templates to recreate the Bootstrap text fields in the New Contact form. By utilizing templates, not only do we ensure controls have a uniform appearance but we also reduce redundancy making the code cleaner and easier to read. Since the templates were given to us and are simple and easy to use, I was able to complete my first attempt at this WOD in Av time of 10 minutes and 39 seconds. After watching the solution, I repeated the WOD and managed to shave off over 5 minutes from my time finishing in just 5 minutes and 15 seconds.

E49: Digits Selection
The third WOD continued with the use of templates but this time we added a selection control to the New Contact form which is a much more complicated task than adding the textbox control. Utilizing selection boxes requires the creation of a backing class that maintains a list of valid options which must be passed to each View that uses that selection box control. The actual implementation is not very difficult but but ensuring that all the pieces fit together can be challenging. This slowed me down a bit during my first attempt at this WOD. I also experienced an import conflict since both the form helper and Bootstrap templates have a “select” method. In the end, I was able to finish this WOD in Av time of just under 38 minutes. Like the previous WODs, I made a second attempt at this exercise after watching the solution and was able to achieve Rx time of 21 minutes and 42 seconds.

E50: Digits Custom Template
In WODs 2 and 3, we used preexisting controls in the Bootstrap template. In the fourth WOD, we created our own control template that consisted of a textbox and selection box. Creating custom templates can be useful if the same form or set of controls is displayed in multiple places throughout your application. However, as a classmate pointed out, there is a drawback – error messages are displayed for all controls in the group if any control contains a validation error. This WOD was not too difficult and I was able to complete my first attempt in Sd time of just under 16 minutes and my second in Rx time of 6 minutes and 17 seconds.

E51: Digits Init
In the fifth and final WOD, we learned how to override the onStartup method of the Global class that allows us to initialize the application to a specified initial state. This was not a difficult WOD, however, I DNF on my initial attempt due to the fact that I imported the wrong application package. This error did not throw an exception – the code compiled but the onStartup method was not invoked. After over 16 minutes, I gave up and watched the solution screencast. I immediately repeated the WOD and finished my second attempt in Rx time of 7 minutes and 26 seconds.

Knowing the State of the Repo
Before beginning each WOD, we were instructed to create a new branch off of the master repo and do the exercise in that branch. At the end of a successful WOD, the branch was to be merged into the master repo. After several WODs, and several series of branching and merging, it can be difficult to know the state of the master repository. Fortunately, Github provides a network diagram tool that visually represents the branching and merging activity of the repository.

Git Network Diagram

This is an extremely useful tool that allows one to quickly get a sense of the current state of the master repo.

Conclusion
Although this weeks WODs were significantly more involved and required more time and effort than any previous WOD, the skills we acquired are necessary for producing a quality application.

Final Project Mockup: Notify Hawai’i

When I registered for this class at the beginning of the semester, I expected two things: 1) that this course would require a lot of hard work and 2) that we would most likely be building a fully functional web application by the end of the semester. At the time, I had no idea what I was going to build for the final project but I did know that whatever it was, I wanted it to be useful.

For the last several months, this project was placed on the “back-burner” in my mind and every-so-often I would think of potential web applications to pursue. I eventually landed on an idea that I thought was not only cool but useful and doable too.

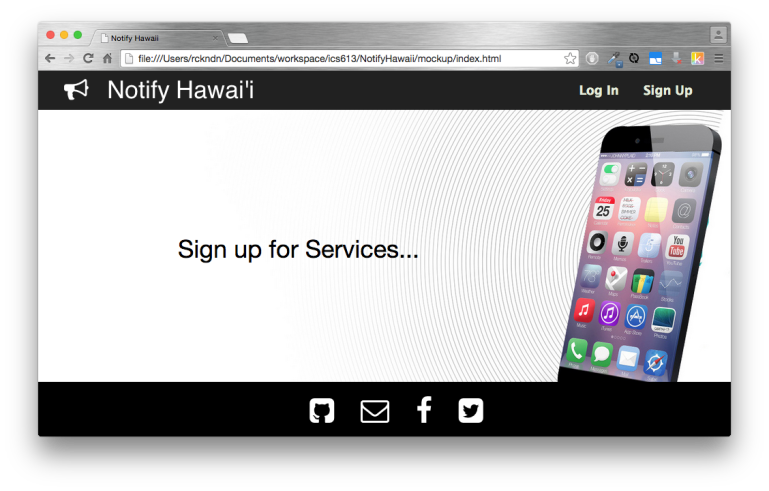
Notify Hawai’i

Notify Hawaii Homepage

Notify Hawaii Homepage


I’ve decided to implement a notification system for services based in Hawaii. Here is a brief description of how I envision the application will work:

Users will be required to create accounts and provide their email and/or phone number. They will then be able to set up specific triggers that will send them notifications by email or text message. These are a few sample triggers that will be built into the application:

  • At a specified time, send me an email with the title and links to the current Honolulu Star Advertiser breaking news articles
  • At another specified time, text me if my commute home is going to take more than 30 minutes
  • Send me a text messages if my bus is running early/late
  • Send me an email if a new Craigslist post matches some parameters (e.g. Apartment for rent, in Manoa, dog friendly, less than $x, etc)
  • Email me if a new blog post is added to a specified WordPress site

For some of these tasks, I’ll rely on 3rd party APIs (Google Maps to estimate commute time, TheBus Web Services API to assess bus schedules) and utilize the Jaunt Web Scraper and Automation tool for the others.

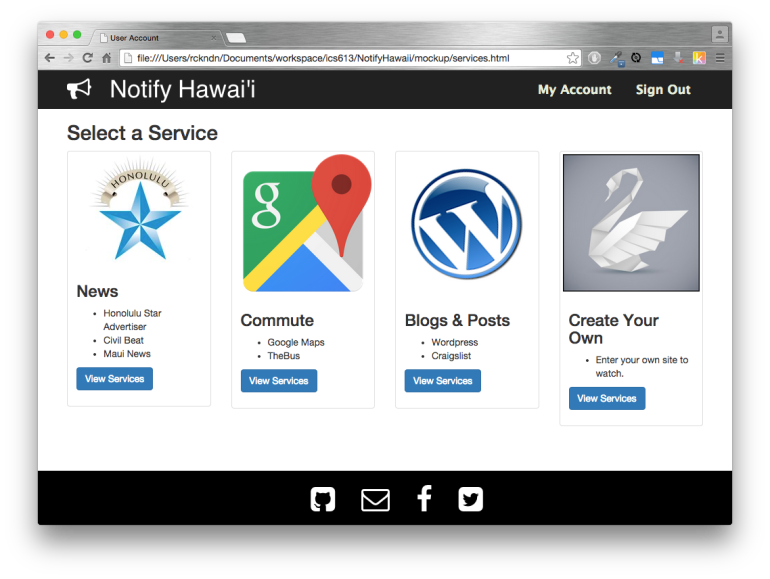
Available Services

Available Services

I am working on this application alone. While I am disappointed that I will not have the opportunity to work with and learn from another student, I do look forward to having full control over the implementation of the application. However, there is a lot of work to be done and I am concerned that I may not be able to accomplish everything that I wish to achieve.

Looking back at my experience building the mockup application (which can be found here), I’ve come to realize that I had no clear direction while working on the app. In my mind, I had an idea of what I wanted the user interface to look like but nothing was concrete until the code had been written. Going forward, I think I would greatly benefit by having a clear and defined set of goals to guide my progress through each milestone. Fortunately, Github already has an Issue tracking tool for this purpose.

This is just the tip of the iceberg and there is still a lot of work to be done on this project. But I believe that this application, if implemented correctly, can be amazingly cool and useful for all users.

Application Design: MVC and Play

Model view controller (or MVC) is a popular and useful software design pattern aimed to help developers separate the internal representation of data from its presentation. In a typical application there are three fundamental components:

  1. the Model which is the internal representation of the data
  2. the View which is the interface in which users interact with the data and
  3. the Controller which are the actions that can be performed on the data model

This week, we focused our attention on applying this design pattern to application created using the Play Framework.

E41: Digits Mockup Results
The goal of the first WOD was simple, create a non-functional mockup of the contacts database web application we call Digits. Since there was no functionality to implement, this WOD exercised our skills using Twitter Bootstrap more than any other technology we’ve used this semester. There are only two pages to the Digits application; a home page that displays a table of current contacts and a ‘New Contact’ page that displays a form used to add new contacts to the database. Since I don’t have the Bootstrap table and form tags memorized, I had to refer to the documentation. In a previous exercise, I bookmarked all of the main sections of the bootstrap reference material which allowed me to quickly find and access the tags I needed to complete this WOD. I attempted this WOD twice with the following results:

  • 1st attempt: 24:51 Av
  • 2nd attempt: 16:52 Rx

E42: Digits Form Results
In the second WOD we enhanced our Digits app by adding partial functionality to the new contacts form. Now when the Add button is clicked, the contents of the form are printed to the console. Prior to attempting this WOD, we were instructed to watch a screencast previewing the process of adding functional forms to a Play application. While watching the screencast, I took detailed notes on the structure and syntax of the additions so that I could refer to it while working on the WOD. This preparation allowed me to complete both of my attempts at this WOD in Rx time:

  • 1st attempt: 16:15 Rx
  • 2nd attempt: 11:21 Rx

E43: Digits Form Validation Results
In the third WOD, we extended the functionality of our web app even further by adding data validation capabilities to the new contact form. With data validation, we are able to ensure that the user doesn’t leave required fields blank or that submitted responses follow a specified format. Play makes the process of validating user input surprisingly easy – simply implement the validate method to identify validation errors and annotate the form controls with the appropriate html/bootstrap tags when errors exist. During my first attempt at this WOD, I mistakenly imported the wrong ValidationError package and spent a few minutes troubleshooting the errors this caused. However, I was still able to complete all attempts at this WOD in Rx time:

  • 1st attempt: 15:52 Rx
  • 2nd attempt: 8:34 Rx

E44: Digits Model Results
The goal of the fourth WOD was to implement an in-memory repository for storing contacts entered by the user and allow the application to dynamically display all the contacts in the database. Implementing the in-memory repo was fairly straightforward as was revising the scala.html files to dynamically generate content, however, I still DNF’d on my first attempt at this WOD. Although I was able to add and retrieve contacts from the repository, I was unable to get the Application test to pass successfully. Only after spending a significant amount of time scouring my code for the bug (and being unsuccessful at finding it) did I think to do a clean compile of the code and re-execute the test. To my surprise (and disappointment that I didn’t think to try this earlier), the test passed. I repeated the WOD twice after this initial attempt and achieved Rx time on both attempts.

  • 1st attempt: 32:31 DNF
  • 2nd attempt: 12:28 Rx
  • 3rd attempt: 12:57 Rx

E45: Digits CRUD Results
The fifth and final WOD took the digits app one step further and provided the user with update capabilities. There are a lot of steps associated with implementing this function, fortunately Dr. Johnson outlined these steps in a screencast we were instructed to watch before tackling the WOD. Although I took notes and referred to these notes while performing the exercise, I still DNF’d on my first attempt due to an error in the way I assigned ids to contacts in the repository. After realizing my mistake, I repeated the WOD twice and achieved Av and Rx time.

  • 1st attempt: 42:58 DNF
  • 2nd attempt: 22:23 Av
  • 3rd attempt: 11:29 Rx

Conclusion
There are many benefits to using and abiding by the MVC design patterns including simplified application development and robust code. However, like many of the technologies we’ve used this semester, the learning curve is steep. But if I learned anything from this series of WODs it’s that by practicing and incrementally adding complexity to practice exercises, even tasks that initially seem complex can become simple.

Web Application Frameworks

play-logo_

This week we began working with the Play web application framework. Frameworks aim to alleviate overhead associated with web application development by providing libraries for common tasks such as database access and user authorization and authentication. Since the developer no longer has to build these functions from scratch, he can focus on implementing the things that really make the app stand out.

But we must learn to walk before we can run and our WODs reflected this.

The first WOD was a simple exercise that had us create a new Play project from scratch, import it into IntelliJ and ensure that it passed all QA tests (i.e. checkstyle, application and integration tests). We were given very clear instructions on how to accomplish these tasks and because of this, I was able to complete my first and only attempt at this WOD in Rx time of 9 minutes and 54 seconds.

The second WOD was a little more interesting than the first. Using this Play Framework template provided by Dr. Johnson, we were instructed to recreate our ‘A history of browsers’ webpage from a previous WOD. Since the HTML and CSS code was already written, we could focus on the simple, yet crucial, details of the framework (like removing views, routes and controllers) and getting a general sense of how to structure apps in this environment. Since I’ve used the Play framework in the past, this WOD was a review of material I already knew therefore, I was able to finish my first attempt in less than 14 minutes qualifying as Rx time. I repeated the WOD twice after watching Dr. Johnson’s solution and completed my second attempt in 7:50 and my third in 9:02.

The third WOD was like the second in that we recreated a project from a prior WOD, however, this exercise was more difficult since it consisted of multiple pages. For a beginner, adding pages to a Play application is a non-trivial task.  Each new page requires its own view file in the Views directory, action method in the Application.java controller file and a defined mapping in the routes file. Initially, it can be difficult to remember how all of these parts fit together in the entire framework but with practice, it becomes routine. Again, since I’ve worked with Play in the past, these exercises were more of a review and I was able to complete my first attempt in 13:03 and my second in 13:55, both qualifying as Rx time.

Like the two WODs before it, the fourth and final WOD was a revisit of a previous project in which we were to recreate the Kamanu Composites website in the Play framework environment. This was a fairly easy WOD to complete since the HTML and CSS code could be copied out of the previous project and because it didn’t require adding new views or modifying routes. I finished my first attempt in Rx time of 11 minutes and 40 seconds and my second attempt in 10 minutes, 31 seconds.

Although the learning curve is steep, using web application frameworks can provide huge benefits. By promoting code reuse, frameworks boost developer efficiency and productivity. By enforcing structure, projects become clearer and more organized. These are just a few of the many reasons learning to use a web application framework is well worth the time and the effort.

UI Frameworks: Twitter Bootstrap

twitter-bootstrapThis week we continued our study of basic UI design with the exploration of Twitter Bootstrap, a front-end framework used to create websites and webapps that dynamically formats content based on the size of the display on which it is being viewed. This versatility allows programmers to implement and maintain a single UI codebase for all users on all platforms (i.e. mobile phones, tables, laptops, desktops, etc). Although mobile phones and tables offer less screen real estate and processing power than laptops and desktops, it is still important to serve up the best looking, most functional page possible despite these restrictions. A common approach (known as the mobile-first approach) is to design for these mobile devices first then scale up for larger displays. This week our WODs focused on redesigning three websites using Twitter Bootstrap and the mobile-first approach.

In the first WOD we were required to revise our “A history of browsers” webpage using Twitter Bootstrap to create a modern, responsive layout. The format of the goal page was relatively simple; a single block at the top of the page containing the introduction paragraph and below that three separate columns, one for each of the three browsers. Despite the simplicity of this exercise, I DNF’d on my first attempt after having spent more than 40 minutes trying to get the formatting just right. At first, the first two columns appeared on the same row and the third overflowed onto the next row. After I managed to get them all on the same row, the spacing between columns was too narrow and columns appeared pushed up next to each other. After watching Dr. Johnson’s solution, I realized my error and immediately repeated the WOD. I completed my second attempt in Rx time of 8 minutes and 3 seconds and my third in 8 minutes and 6 seconds.

The second WOD had us recreate the Kamanu Composites website, again using Twitter Bootstrap to provide a responsive design. Like the previous WOD, the format of this page was relatively simple; a navigation bar across the top, under that an image spanning the width of the screen and finally a simple footer with the tagline “We build canoes.” Having used Twitter Bootstrap before, I was confident that I would be able to complete this WOD in Rx time however, my initial attempt took slightly over 1 hour to complete. I struggled to correctly position the logo in the nav-bar and found it difficult to prevent the links from collapsing into two rows when resizing the browser. Throughout the solution screencast, Dr. Johnson frequently used Chrome’s developer tools to inspect elements of the page and guide his implementation. During my second and third attempts at this WOD, I relied more heavily on these tools to guide my design and completed both in Rx time of 18:37 and 16:50, respectively.

In the final WOD we gave the Castle High School homepage a modern, mobile-first, make-over. The requirements of this WOD were similar to that of those that came before it so I was actually able to complete my first attempt in Sd time of 41 minutes and 12 seconds. Since I cannot pinpoint any one task that consumed the majority of this time, I attribute it to the fact that I hadn’t yet achieved fluency and so my implementation decisions and actions were slow and inefficient. But like everything else, practice makes perfect and I was able to improve my time by 21 minutes during my second attempt (achieving Rx time of 20:30) and by 23 minutes during my third (again achieving Rx time of 18:36).

With approximately 60% of American adults owning a smartphone, the mobile-first approach to design is more crucial now than ever before. There is no doubt in my mind that the skills we’re learning now will be useful in the future.

UI Design Basics – HTML and CSS

HTML and CSS are the fundamental languages of web design. While there are tools available that enables one to create decent sites without ever writing a line of code, sites and webapps of even moderate complexity require that the designer have some understanding of HTML and CSS. This week, our WODs focused on these two languages.

In the first WOD, we were to create a simple webpage describing the history of 3 common internet browsers. The page followed a top-down format where each element (headers, paragraphs, images) occurred on its own line. Since there was no complicated formatting requirements, the page could be written entirely in html.

I initially thought I was going to do fairly well on my first attempt, after all, it is just html code but soon after starting I quickly realized that my skills had become a little rusty from lack of use. I had forgotten how to link to specific sections of the document and spent several minutes googling the correct way to perform this task. I also spent a great deal of time struggling with the IDE. I found that in some instances, IntelliJ prints a single double quote character when the key is pressed but in other instances, prints a pair. When a pair is printed, the cursor is sometimes placed between the pair and sometimes after. I didn’t notice any pattern to this behavior and spent several minutes fixing mistakes caused by this “feature.” Despite these issues, I was able to complete my first attempt in just under 22 minutes which qualified as Sd time. I repeated the WOD twice and achieved Rx time in both attempts. I completed the second trial in 12:28 and my third in 10:11.

In the second WOD, we were to implement minor design changes to the page created in the previous exercise using CSS stylesheets. These changes included linking to and using Google fonts, changing text and background colors, and positioning images inline with text. It was this last requirement that got me. I spent close to 10 minutes trying to properly place the logos beside the text which resulted in a finish time of 15min 37sec (Sd time). Like the first WOD, I repeated this exercise twice and saw improvement in both runs. I completed the second run in 5:13 and the third in 3:27, both qualifying as Rx time.

The third and final WOD, had us modify our browser history page to include a slightly more complicated layout. This involved converting an unordered list of links into a horizontal navbar and structuring the content of the page into 3 columns of identical width. During my first attempt, I accomplished this by putting the elements into tables and structuring the tables to meet the required format. I finished the WOD in Sd time of just over 16 minutes. During my second and third attempts, instead of using tables to format the page, I wrapped the content in separate div’s and specified the position of each div in the CSS file. This was a much cleaner and more flexible approach. I was able to complete my second attempt in Av time of 14:19 and my third in Rx time of 6:06.

Looking back, these exercises shouldn’t be difficult for any web developer worth their salt. Admittedly, I initially struggled to complete the WODs since I haven’t been actively writing HTML or CSS code. Fortunately, these languages aren’t very difficult and this experience reminded me of a lot that I had forgotten.

Quality Assurance and Testing

bugI think it’s safe to assume that we all have similar expectations when it comes to the goods and services we purchase. For example, when we shop for groceries, we expect that the food is clean and safe to eat. When we buy a car we expect that it will run for many years without any major issues. When we download software, we expect that it will do the task it claims to do and that it will do it correctly.

But how do vendors ensure that they meet these expectations? They test.

Testing is an essential part of every production cycle because everybody makes mistakes. Some mistakes are tiny and minimally impact a system while others can be fatal. Testing can aid in identifying these mistakes and preventing them from ever reoccurring.

This week, our lesson focused on the importance of testing during the development of software. We also discussed how to design tests to thoroughly challenge every component of a software system so as to be confident that we are producing a quality product.

The Workout

In this weeks set of WODs, we were challenged to revise our Project Euler submissions from an earlier WOD to include at least two JUnit tests. A complete description of the WODs can be found here and here.

Both WODs begin by creating a new branch off of the master repository. It is in this branch that we’ll work on implementing the tests. Since these branches are not merged into the master repo, we are able to repeat the WOD simply by creating a new branch off of the master.

To review, the goal of Problem 1 is to find the sum of terms less than 1000 that are divisible by 3 or 5. In my initial attempt, I refactored my code and created two helper methods; one to identify terms divisible by 3 or 5 (named isDivisibleByThreeOrFive) and another to calculate the sum of these terms (named getSum).

To test the isDivisibleByThreeOrFive method, I created three loops; one that iterated over all numbers divisible by three, another that iterated over all numbers divisible by 5, and finally one that iterated over numbers divisible by neither 3 nor 5. All loops stopped at 1000. These tests were designed with the intent of challenging both true and false responses. To test the getSum method, I looked up the solution to Problem 1 and compared the answer to the value returned by this method.

Both tests were successful so I committed my changes to Github and considered the WOD complete with an Av time of 15:48. However, I immediately realized that I forgot to ensure that the code met our coding standards (i.e. complying with EJS, ICS613 standards, and Checkstyle guidelines). Because it was not compliant, I now consider my performance on this initial attempt as a DNF.

After watching the solution screencast, I repeated the WOD twice. In both attempts, I implemented the same test cases as Dr. Johnson and made sure that all style violations were fixed before committing my changes to Github. I completed my second and third attempts in 8 minutes, 10 seconds and 5 minutes, 13 seconds, respectively. Both times quality for Rx time.

In Problem 2, we were to compute the sum of all even terms of the Fibonacci sequence that are less than 4 million. Since the structure of the solution was very similar to that of the previous exercise, I was able to complete my first attempt in Av time of 11 minutes and 31 seconds. Like the previous WOD, I repeated this WOD twice and saw my time improve with each run. I completed my second attempt in 8 minutes, 10 seconds and my third in 5 minutes, 13 seconds. Again, both qualifying for Rx time.

Reflection

I’ve known for a long time that testing is extremely important, however, I find that I rarely take the time to thoroughly test my code. This occurs because testing is usually an afterthought and would require writing the tests after the code had already been written. A better approach would be to consider the tests equally important as the program and to develop the two in parallel. And since IntelliJ and JUnit make writing tests so quick and simple, I really have no excuse to not do so in the future.

Hackaday

Fresh hacks every day

Slashdot

Professional Portfolio